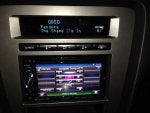
Mustang Evolution Forum banner
21 - 40 of 446 Posts
Ah ok, well that's one less thing you have to worry about. I was going to offer up some advice for finding the SYNC wire during install but don't have to worry about that.

When you run the two wires to the OBD connector for the Telemetry stuff, DO NOT use those crappy vampire connectors. Please learn from my experience here. I had to contort myself underneath my dash 3 times because I tried to make those stupid things work. Do yourself a favor and splice into the wires directly. If you do use wire taps, the ONLY wire tapping connector I would recommend ,and I would have used myself if I could find them locally, is the POSI-TAP connectors. Those are the real deal and work flawlessly.

That's my .02 cents for the day :)
 
Antenna Adapter

Capn Morgan - If you want to retain your OEM radio antenna, you will also need an adapter from your factory plug to the Kenwood HU (I have the DNX890HD)...you can get an adapter at Autozone or Advance Auto Parts for around $10...I picked mine up at Autozone, part # AW-CR10...I don't remember who makes the adapter, but it will be easy to determine once you get there and look. I finished my install yesterday and am very please with it's operation. Here are a few pics.


Ah ok, well that's one less thing you have to worry about. I was going to offer up some advice for finding the SYNC wire during install but don't have to worry about that. When you run the two wires to the OBD connector for the Telemetry stuff, DO NOT use those crappy vampire connectors. Please learn from my experience here. I had to contort myself underneath my dash 3 times because I tried to make those stupid things work. Do yourself a favor and splice into the wires directly. If you do use wire taps, the ONLY wire tapping connector I would recommend ,and I would have used myself if I could find them locally, is the POSI-TAP connectors. Those are the real deal and work flawlessly. That's my .02 cents for the day :)
Agree totally...I stripped back the 2 wires about 1/3 of an inch, soldered the two kit wires onto the OBD wires, wrapped with electrical tape and then used a zip tie on the tape to ensure it won't unwrap. This will ensure you have no loose connections now and in the long-term.
 
Discussion starter · #25 ·
Agree totally...I stripped back the 2 wires about 1/3 of an inch, soldered the two kit wires onto the OBD wires, wrapped with electrical tape and then used a zip tie on the tape to ensure it won't unwrap. This will ensure you have no loose connections now and in the long-term.
For all of my connections I use these. You can pick them up at any hardware store and they work muuuuch better than just using electrical tape. Strip the wire back a little and put it in the connector and use a wire crimp to crimp the connector. Best way imo
 
For all of my connections I use these. You can pick them up at any hardware store and they work muuuuch better than just using electrical tape. Strip the wire back a little and put it in the connector and use a wire crimp to crimp the connector. Best way imo
You did read I soldered the wires, right? I didn't use "just" electrical tape. :) that wouldn't be a very secure connection.
 
Discussion starter · #27 ·
You did read I soldered the wires, right? I didn't use "just" electrical tape. :) that wouldn't be a very secure connection.
Whoops. I actually forgot to include the picture of what I use. It's still too early lol. These are still easier and quicker than solder ;)
 

Attachments

The butt splice doesn't work for attaching the kit wires to the OBD wires, at least not very well...you don't cut the OBD wires. Hopefully you haven't cut yours :(
Correct. I also use butt connectors when attaching two cut wires when I can't get my soldering iron in there however, you will not be cutting the wires on the OBD plug when you run those 2 wires from the HU. You will need to "splice" into the existing wires. A butt connector will not work in this instance. If you were hell bent on using the butt connector, I suppose you could cut the OBD wires and insert the HU wires along with the OBD wires in one end and then the other side of the OBD wire on the other end and crimp.
 
NOOOOOOO! Awe man of all the luck. Sorry to hear.
 
That is truly a bummer. I just ordered my setup today! Can't wait to get it.

Kenwood DNN770HD
Maestro RR
MUS1 Dash kit
Antenna adapter

I'm new here and I don't want to spam but I found a great deal and they have been super quick to respond to emails.

I have no financial stake in this but if it against the rules (didn't seem to be) I apologize, just wanted to pass on what I thought was great!


DNN990HD
ADSMRR
ADSKITMUS01

= was $2200 / Now $1799.99 / $500 COUPON for SVT forum members only coupon code SOTS500 – makes final price for all three pieces $1299.99

Kenwood DNN990HD Navigation receiver with Wi-Fi ADSKITMUS1 ADS Maestro Mustang Ford Kit and ADSMRR Steering Wheel Control Adapter


DNN770HD
ADSMRR
ADSKITMUS01

= was $1999 / Now $1599.99 / $500 COUPON code SOTS500 – makes the price for all three pieces 1099.99

Kenwood eXcelon DNN770HD In-Dash 6.1" Touchscreen DVD/MP3/USB Car Stereo Receiver w/ GPS Navigation, Bluetooth and Wi-Fi Ready with the iDatalink ADS-KIT-MUS01 Factory Integration Fit Kit with iDatalink ADS-MRR Factory Integration Adapter


DNX890HD
ADSMRR
ADSKITMUS01

= was $1800 / Now $1499.99 / $400 COUPON code SOTS400 – makes the price for all three pieces $1099.99

Kenwood Excelon DNX890HD Navigation receiver 6.1" WVGA double-DIN Navigation/DVD Receiver, Built-in Bluetooth Automatic BT pairing for iPhone with ADSKITMUS1 and ADSMRR Maestro Steering Wheel Adapter and Mustang Kit


DNX690HD
ADSMRR
ADSKITMUS01

= was $1500 / Now $1250.99 / $250 COUPON code SOTS250 --- makes the price for all three pieces $1000.99

Kenwood Excelon DNX690HD Navigation receiver 13C 6.1" WVGA double-DIN Navigation/DVD Receiver, Built-in Bluetooth Automatic BT pairing for iPhone ADS Maestro ADSMRR and ADSKITMUS01 Mustang Kit

The deals are good until 12/31/13 and here is an email. joy@soundoftristate.com
 
Discussion starter · #34 ·
Wow man that sucks but please keep us updated I want to do this to my car to, question...the dash kit removes the climate control?
I plan on continuing the thread as soon as I get a replacement. But to answer your question yes. It removes the climate controls and puts them on to your radio. Very neat and clean and that's why you can only use certain Kenwood radios.
 
I plan on continuing the thread as soon as I get a replacement. But to answer your question yes. It removes the climate controls and puts them on to your radio. Very neat and clean and that's why you can only use certain Kenwood radios.
Thank you and that is very nice that's the way my buddies fullyloaded FX4 is but came stock like that
 
My MUS1/Maestro RR/Kenwood DNN770HD install

Here is a link to my install album.

I installed a Kenwood DNN770HD head unit with the Maestro RR and MUS1 Dashkit. Thanks to the instructions it was quite straight forward and I encountered no real issues.

Programming the Maestro RR over USB is easy but you do need a windows computer. I used a VM on my Mac and it worked fine.

I followed the wiring instructions and soldered all connections. Hardest part was deciding on locations for the GPS bug and microphone. I didn't want them to stand out after going through the expense and trouble of a sleek system. I put the GPS bug up near the A pillar on the driver side. I put the mic on the steering column on the right. Kinda near the key. I'm happy with both if you don't go looking for them you won't notice.

It was not immediately obvious to me where on the Kenwood to plug in the Maestro audio cable. Is this audio in or out? In the end I plugged it into the AV-OUT audio jack. If this is wrong I don't see any loss of function yet.

The pandora integration is amazing. The head unit shows the picture, stations, everything. The LCD display shows the song and time.

What a great setup!
 

Attachments

Here is a link to my install album. I installed a Kenwood DNN770HD head unit with the Maestro RR and MUS1 Dashkit. Thanks to the instructions it was quite straight forward and I encountered no real issues. Programming the Maestro RR over USB is easy but you do need a windows computer. I used a VM on my Mac and it worked fine. I followed the wiring instructions and soldered all connections. Hardest part was deciding on locations for the GPS bug and microphone. I didn't want them to stand out after going through the expense and trouble of a sleek system. I put the GPS bug up near the A pillar on the driver side. I put the mic on the steering column on the right. Kinda near the key. I'm happy with both if you don't go looking for them you won't notice. It was not immediately obvious to me where on the Kenwood to plug in the Maestro audio cable. Is this audio in or out? In the end I plugged it into the AV-OUT audio jack. If this is wrong I don't see any loss of function yet. The pandora integration is amazing. The head unit shows the picture, stations, everything. The LCD display shows the song and time. What a great setup!
Is the mic you installed required to operate the Kenwood HU or because you don't have Sync?
 
Hmm I'll bet that is what the audio wire from the Maestro RR is - the microphone. The instructions weren't very clear on that. I wonder even without sync if the microphone is in the car - and I can delete my mic I added. Or just delete that cable.

FYI I ordered all this through a company. I have no financial stake in this. But they gave me great service and a great discount.

The have some other deals to - I went with this one

DNN770HD
ADSMRR
ADSKITMUS01

= was $1999 / Now $1599.99 / $500 coupon code SOTS500 – makes the price for all three pieces 1099.99

Kenwood eXcelon DNN770HD In-Dash 6.1" Touchscreen DVD/MP3/USB Car Stereo Receiver w/ GPS Navigation, Bluetooth and Wi-Fi Ready with the iDatalink ADS-KIT-MUS01 Factory Integration Fit Kit with iDatalink ADS-MRR Factory Integration Adapter

Joy is very responsive to emails


Hi Guys,


Our 3.5mm input is for stereo audio input from our box to the radio. The microphone for Sync does not need to run through our module at all. So, if you have Sync, the factory mic will only work with Sync (not with the Kenwood radio) and need to install the Kenwood mic if you have one of the Kenwood radios with voice recognition and want to use both. If you don't have Sync, you will need to install the mic that came with the radio for sure.


Hope this is clear.


Hey guys. Got my new radio today. Ran my harness and plugged it in to see this...huge props to UPS for their excellent shipping! 2 more weeks now...cool.


What a freaking DOWNER!!! :banghead:
 
21 - 40 of 446 Posts